Recently, I have gifted some fun little notions to friends that have been very well received - customised tape measures. You might remember them from here.
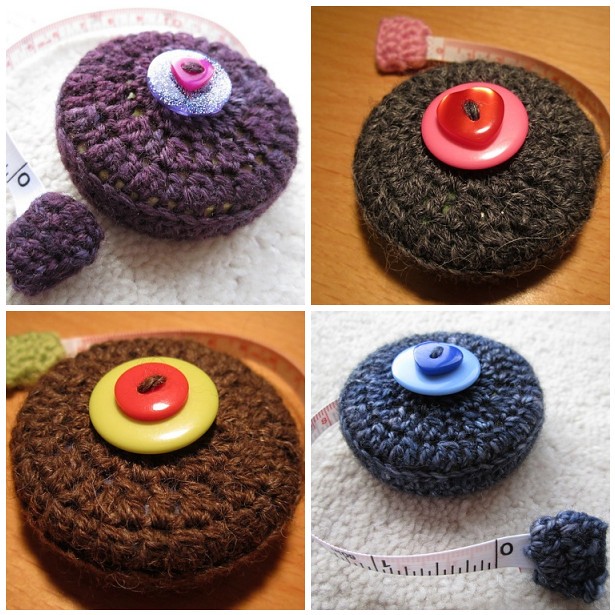
So I thought I would share with you how to make one of your very own!! It's very easy, honest! All you need is some 4ply yarn, a retractable tape measure, a couple of crochet hooks, buttons, a darning needle and a sewing needle.
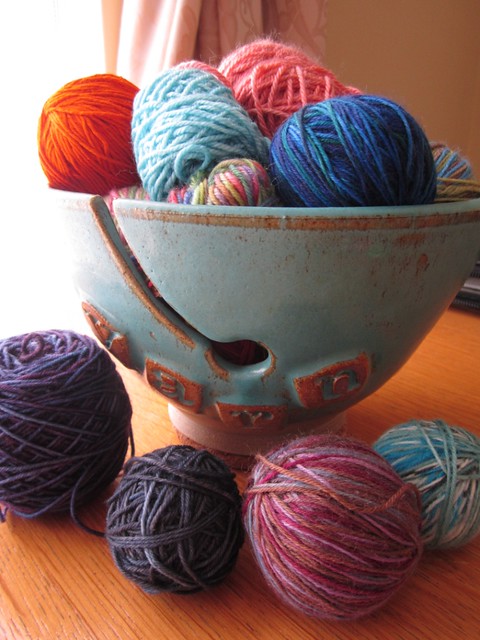
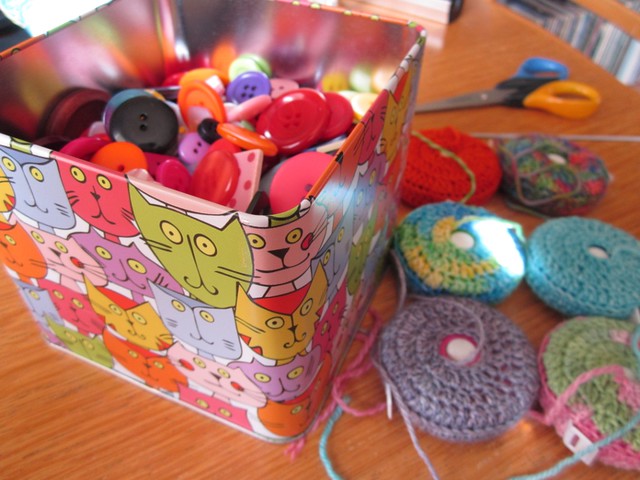
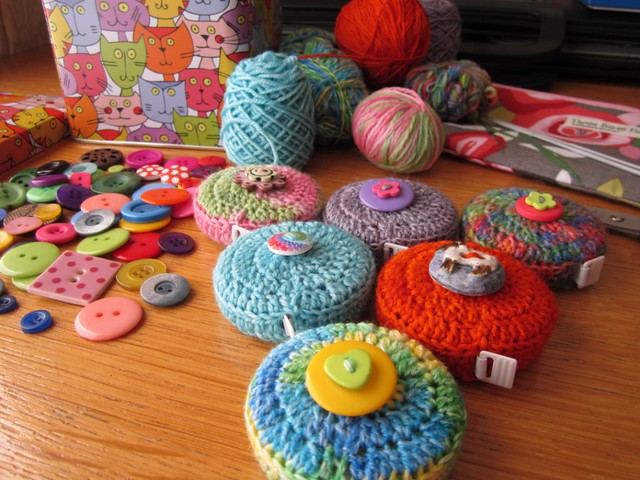
Start off by having a rummage through your oddments of 4ply yarn to find something that catches your eye. As I have knit loads of pairs of socks, as well as cowls and scarves, my leftovers box is bulging at the seams! I cannot bear to thrown away even the shortest length of yarn - it'll come in useful one day, even if it's just for tying up a skein of hand spun yarn! Besides which, I attach so many memories to yarn, just holding those little balls of leftovers conjures up lots of happy thoughts. The pale purple yarn at the top was bought when Mr JK ran a 10K race in London. The wine red yarn next to it was some of my handspun, knit from fibre sent over from Cathy in Canada, which I used to make a beaded Wandering Thyme shawl! It's like rediscovering old friends!

Try not to let yourself become distracted as you delve deep into your box of treasures and make your selection! I put mine into my new yarn bowl - they look like scoops of delicious ice cream!! The bright orange yarn was my first time knitting with Wollmeise yarn - I won this skein in a giveway on Kate's blog and knit a pair of socks for my dear friend Snoopydog's daughter. The aqua yarn was a gift from another lovely friend Kat, in the USA and the peach coloured yarn was given to me when I met up with Katharine earlier this year. The little multi-coloured ball peeping over the edge was from some sock yarn I bought on a trip to Canada 6 years ago! So many wonderful memories of happy times spent with people I love.
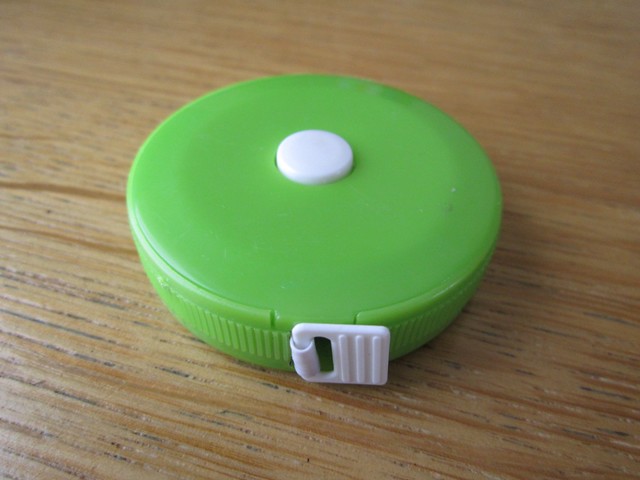
Anyway, back to business! You need a retractable tape measure like this. The colour isn't important as the plastic casing is going to be hidden by your crocheted cover.
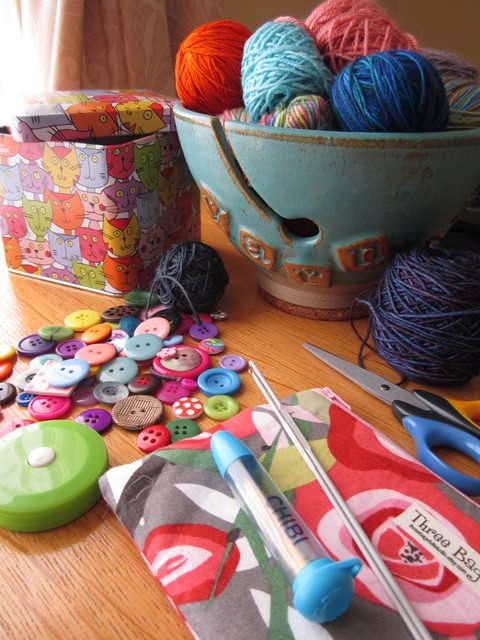
Gather together everything else you will need - a 2.00mm crochet hook and a 2.5mm crochet hook, buttons, darning needle, sewing needle with a biggish eye and scissors - and you are ready to start! (I am using UK crochet terms here.)
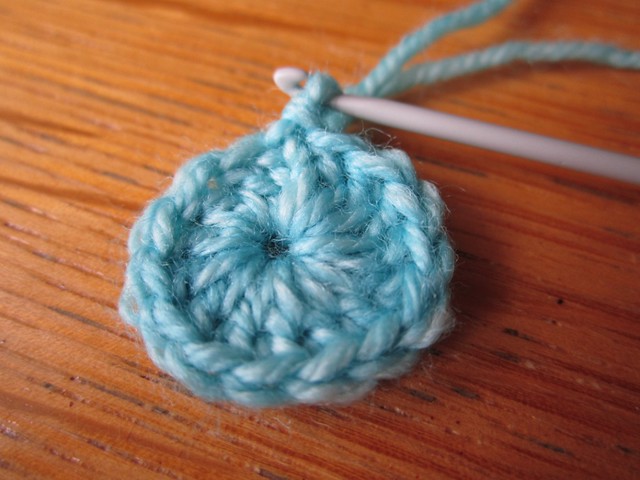
Base
Step 1
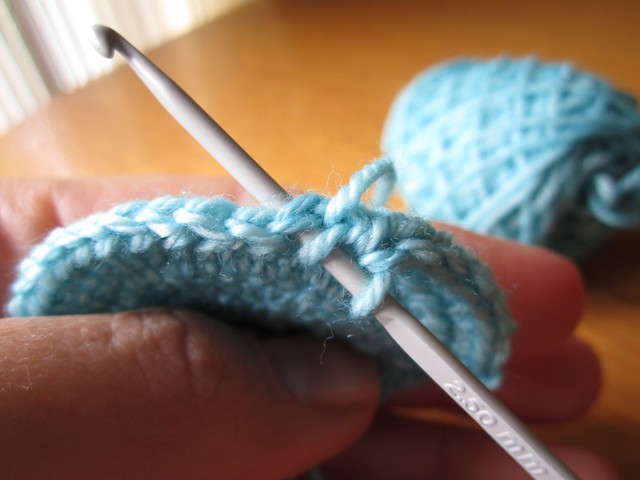
Using the 2.00mm crochet hook, make a slip stitch and chain 5. Join the chain into a ring by making a slip stitch into the first chain.
Step 2
Chain 3, then treble 14 times into the round, slip stitch into the top of the 3 chain. It might look like an impossible task to get all those trebles in there, but keep going! They will fit, I promise!
Step 3
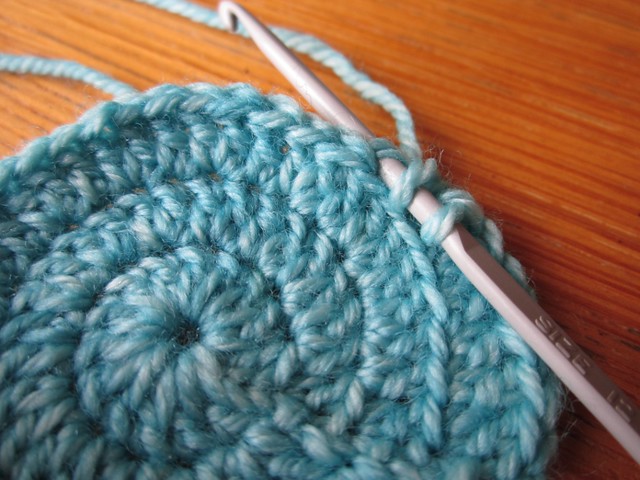
Chain 3, treble into the same stitch and then treble twice into each stitch all the way round. Slip stitch into the top of the 3 chain to complete the round. You should end up with 30 stitches at the end of this.
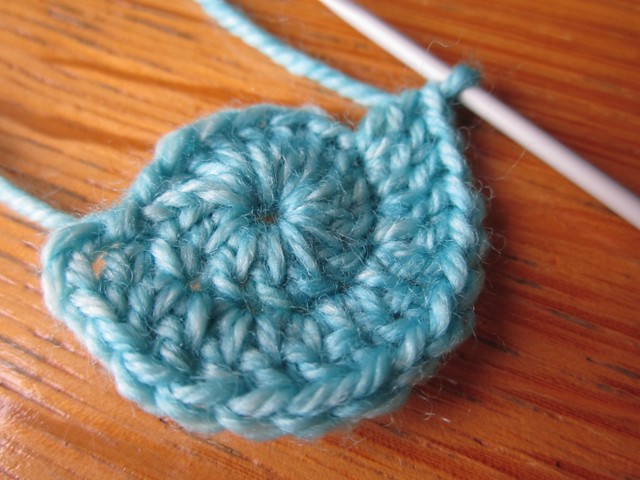
Step 4
Chain 3, treble into the same stitch, (treble into next stitch, 2 treble into next stitch), repeat around until you get to the last treble, treble into last stitch and slip stitch to the top of the 3 chain to join the round. This completes the base of the cosy - you're almost halfway there!!
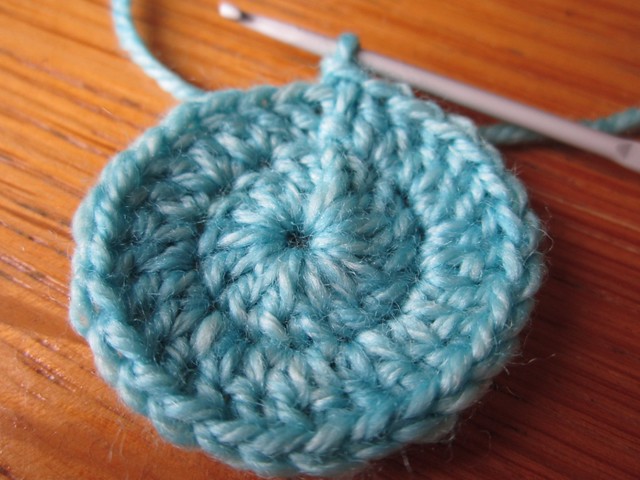
Sides
Step 1
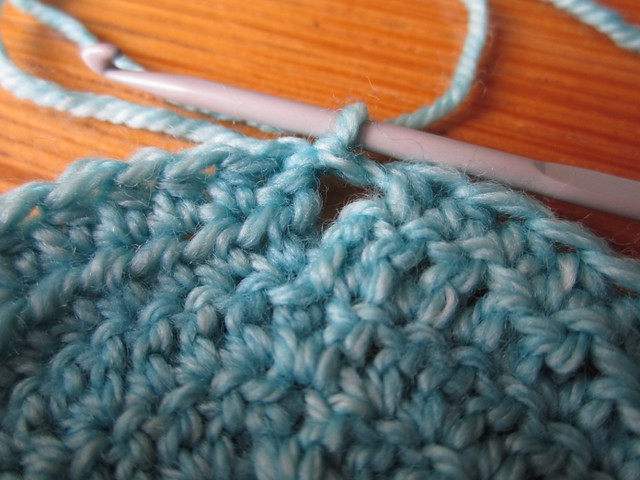
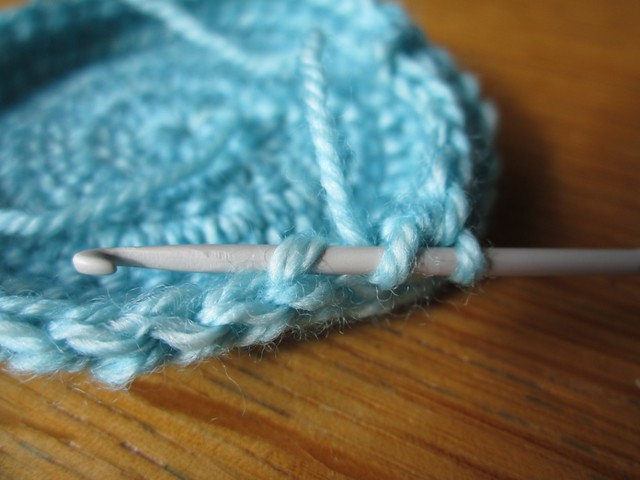
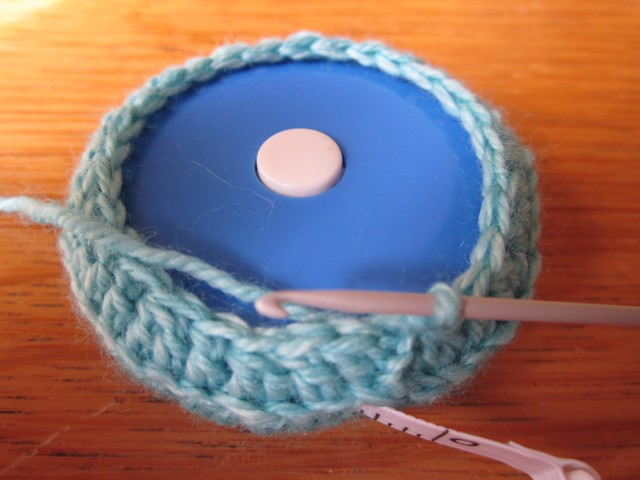
Change to 2.5mm hook. The reason for this is that you are going to be creating a gap where the tape measure will slide through, and I found that using a 2.00mm hook made it a little tight and the tape measure didn't always retract smoothly. Chain 2, half treble into each treble stitch, only going through the back loop of each stitch. This will create a nice edge. When you get to the end, do NOT join!
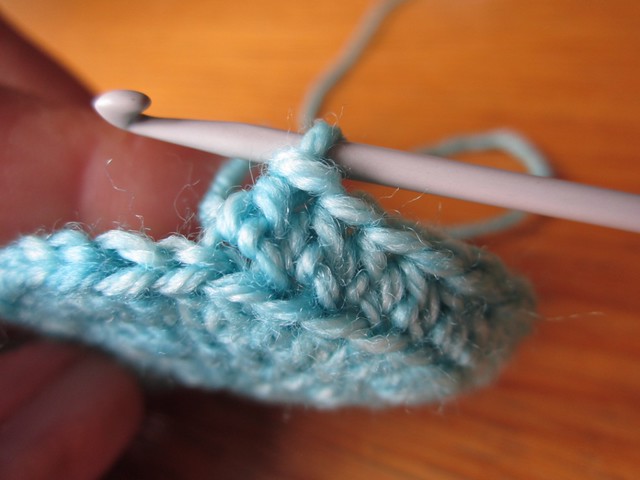
You can see in the photo above how the edging wants to fold up, almost like a little crocheted dish!
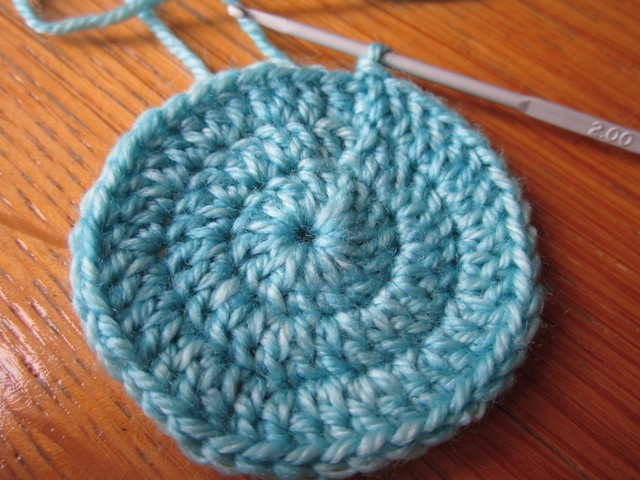
Step 2
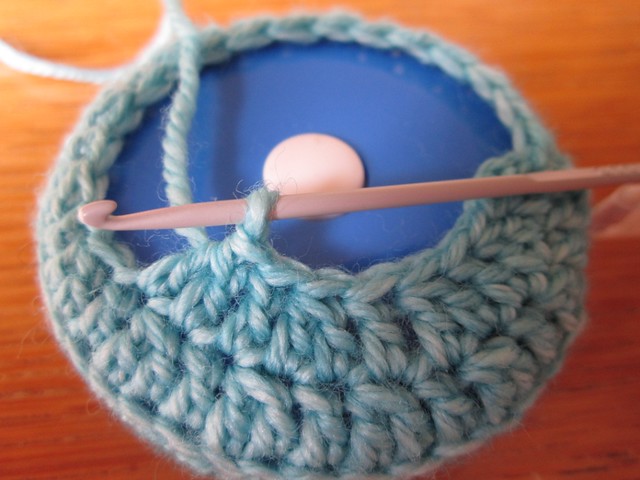
Chain 2 and turn your work so the wrong side is facing you.
Half treble into each stitch back the way you just came, this time going through both loops of the stitch until you get back to the start of the round. Slip stitch into the top of the 3 chain to join the round.
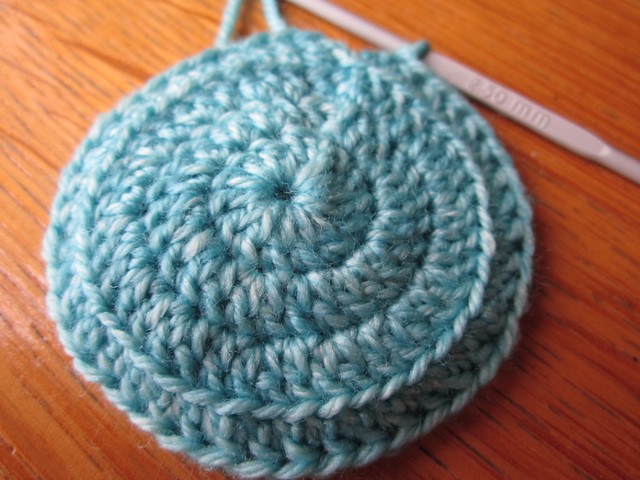
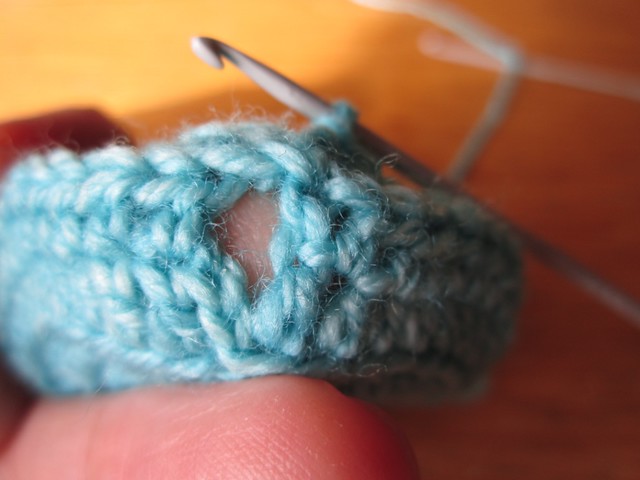
You should be able to see the little gap that the tape measure will fit through.
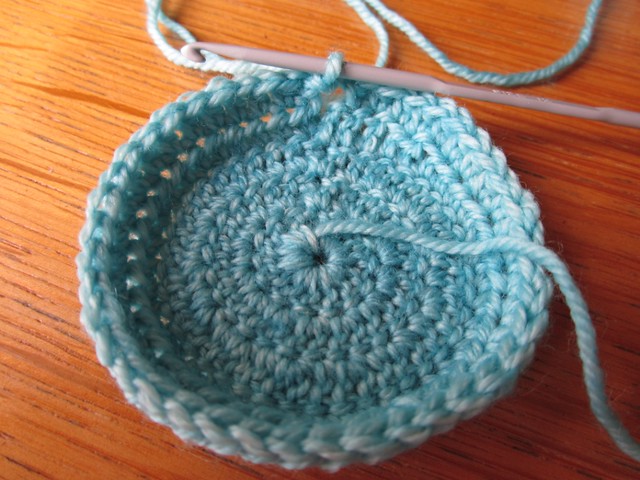
That's the sides completed now! Just the top to go!
Top
Step 1
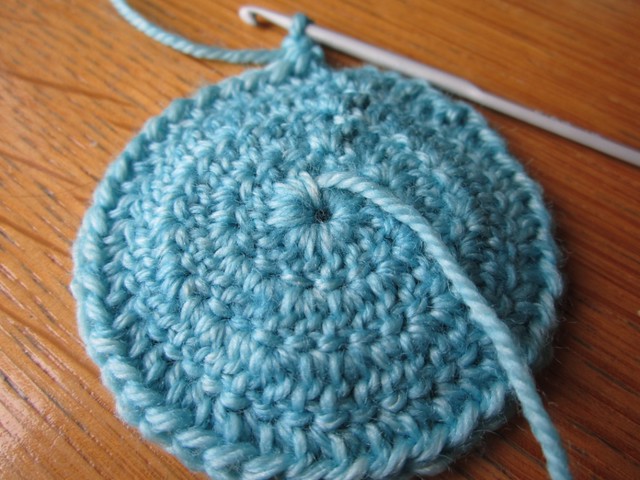
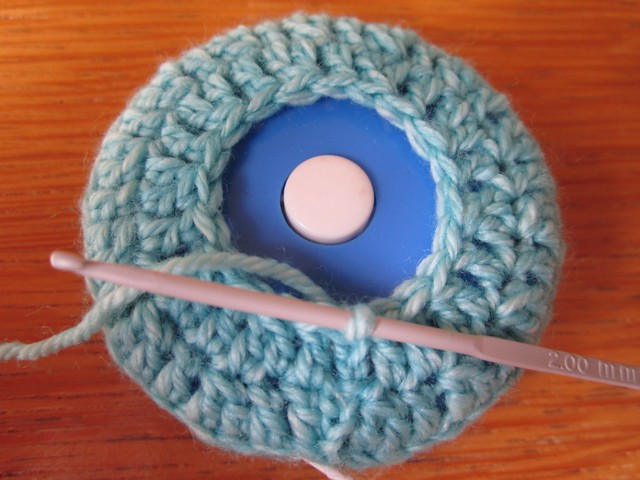
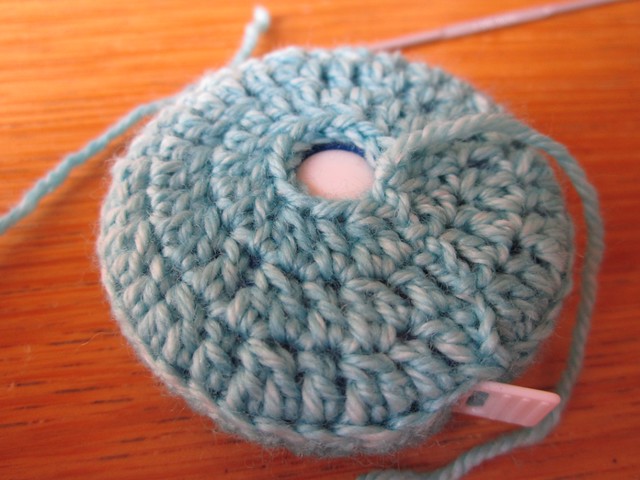
Change back to a 2.00mm hook, chain 3 and then turn so the right side of your work is facing you. For this round you need to crochet through the back loop of each stitch only as this will make the top edging. (Treble into the next stitch, treble decrease into the next 2 stitches) and repeat around. Slip stitch into the top of the 3 chain to join the round.
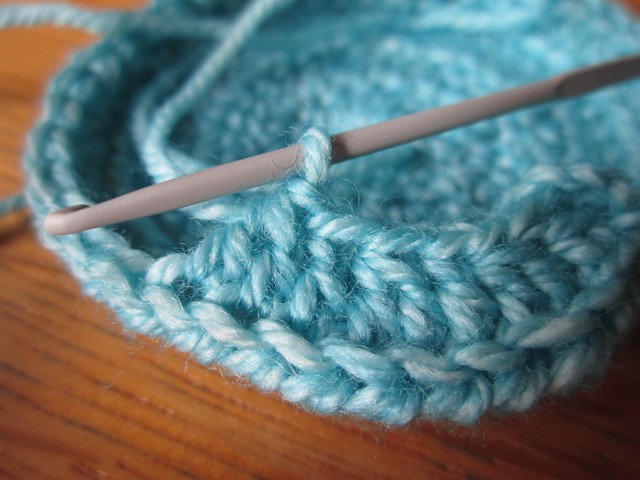
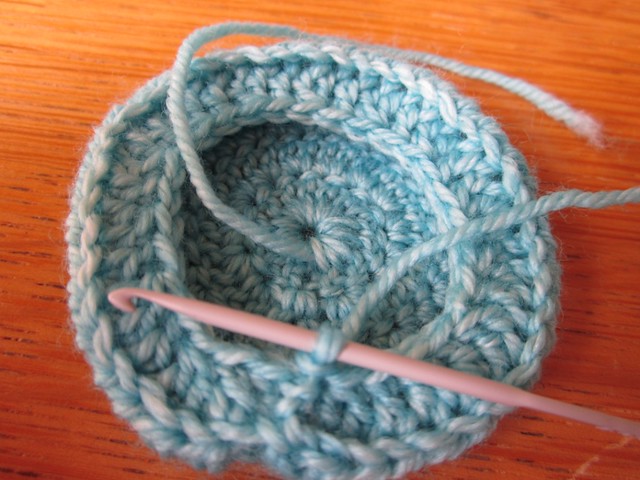
You can see the gap you've created quite clearly now.
Now's the time to weave in the tail end from the start - I just went around in a circle and secured it - you don't want it to come loose or peep out anywhere!

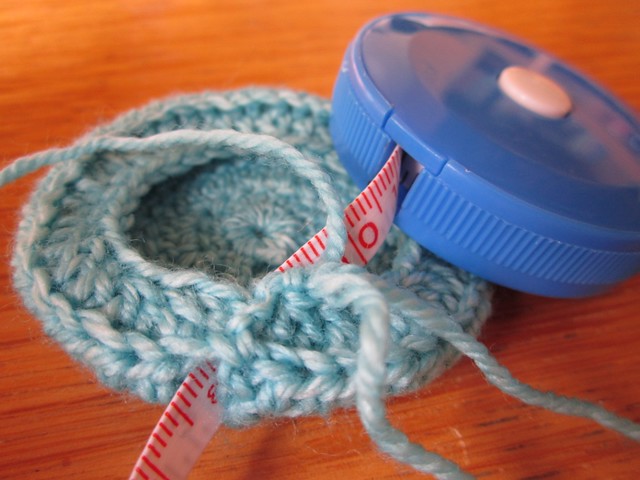
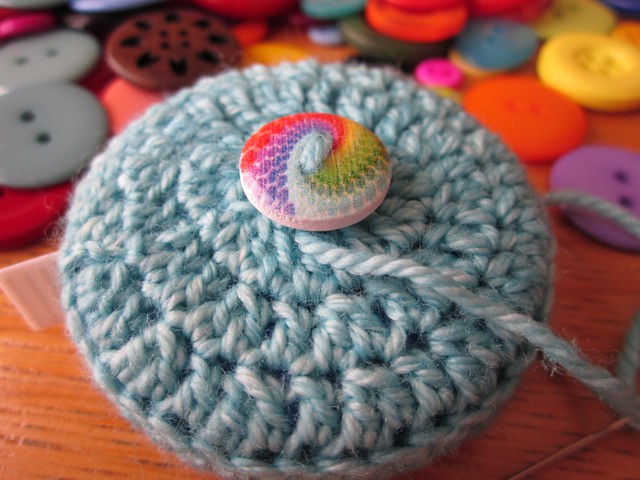
Get your tape measure and fit it inside the cosy. I found it easier to poke the tape out through the gap - you need to line up this gap with the point on the measure where the tape comes out. Make sure the button you press to retract the tape measure is facing upwards!
Step 2
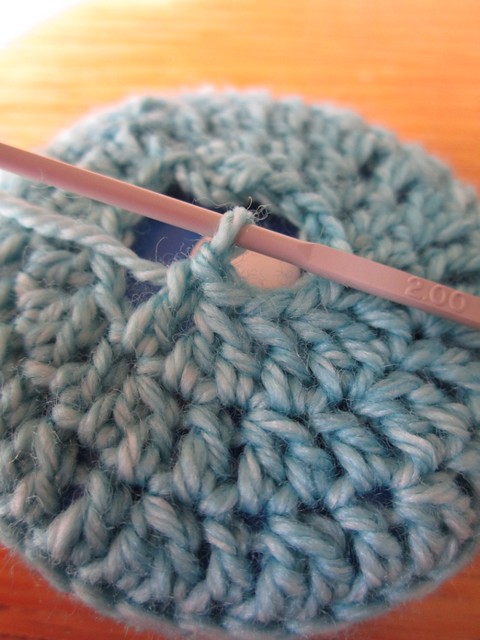
Chain 3, (treble into the next stitch, treble decrease into the next 2 stitches) and repeat around. This time, you will be crocheting through both loops of the stitch each time so the top is nice and flat. Slip stitch into the top of the 3 chain to join the round.
You're almost there, only one round to go!
Step 3
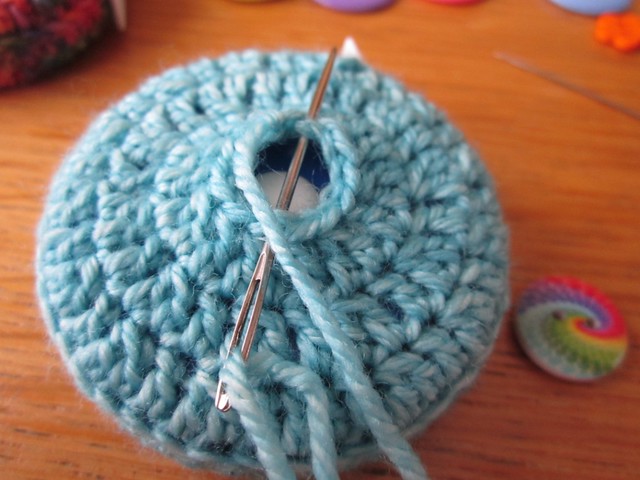
Chain 3, (treble into the next stitch, treble decrease into the next 2 stitches) and repeat around. Again, make sure you crochet through both loops of the stitch. Slip stitch into the top of the 3 chain to join the round. Cut the yarn, leaving a tail of about 20cm and fasten off. You will use this tail to secure your buttons.
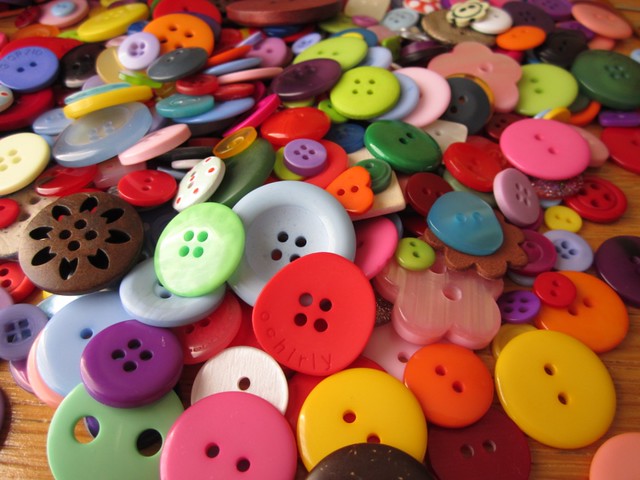
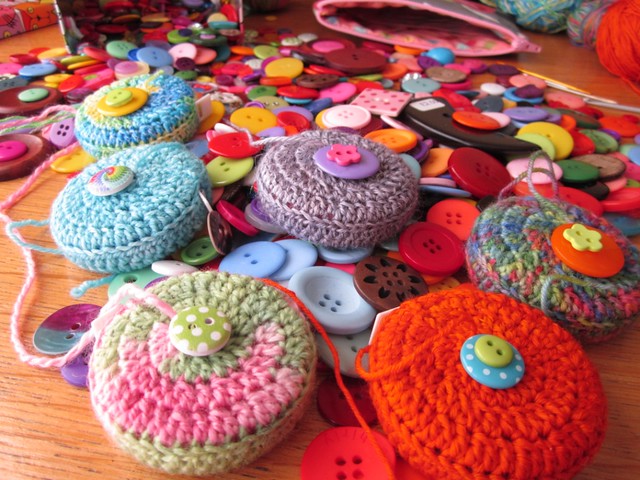
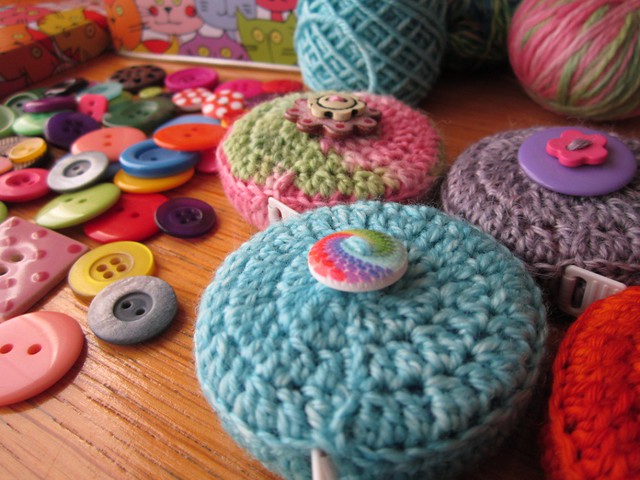
Next comes my favourite part - the buttons!! Oh I love buttons - just take a look at all this buttony goodness here! I love to collect buttons and always keep an eye open for them on my travels!
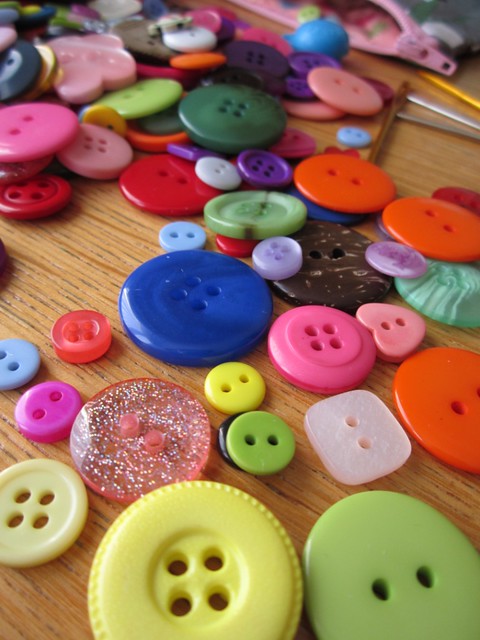
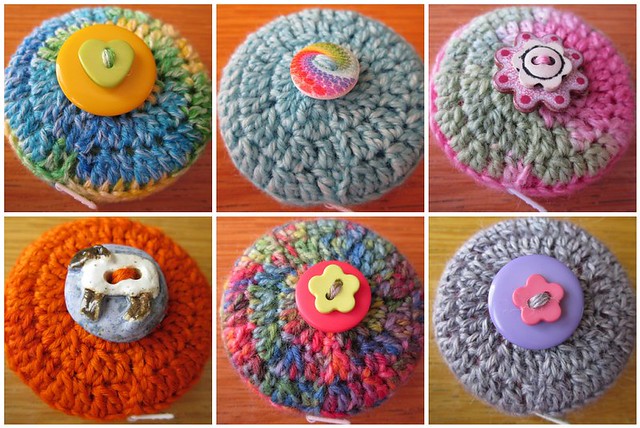
It's time to start playing!! I tried out lots of button combinations before I was happy! You can put one button on top of another, whatever you like! Just make sure that you can press down firmly on your choice, as it's going to sit on top of the spot you need to press on to make your tape measure retract.
When you've chosen your buttons, thread the tail end of the yarn on the darning needle and go across the top of the gap at the top of the cosy to close it.

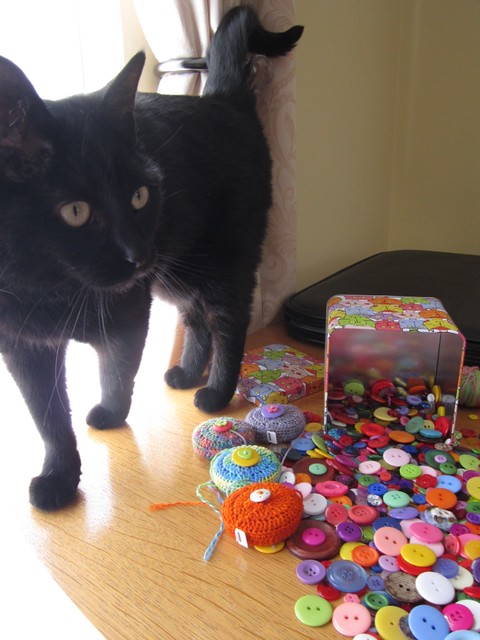
Change the darning needle for a sewing needle and make sure that it's not too thick to go through the holes in the buttons. Pick one with a big enough eye to thread the yarn through easily. Try to keep your cat away from the buttons - mine thinks they are all lovely kitty toys for her!! She also stole a little ball of yarn to squirrel away in her igloo. Luckily I spotted her!! Otherwise she tends to try and bring me these 'trophies' in the middle of the night! Bless!
Sew on your button and secure it underneath the button where it won't show. Leave the tail long so that you can 'lose' the end inside the cosy. I thread my darning needle and take the tail underneath the crochet cosy and back round to the base before snipping the end.
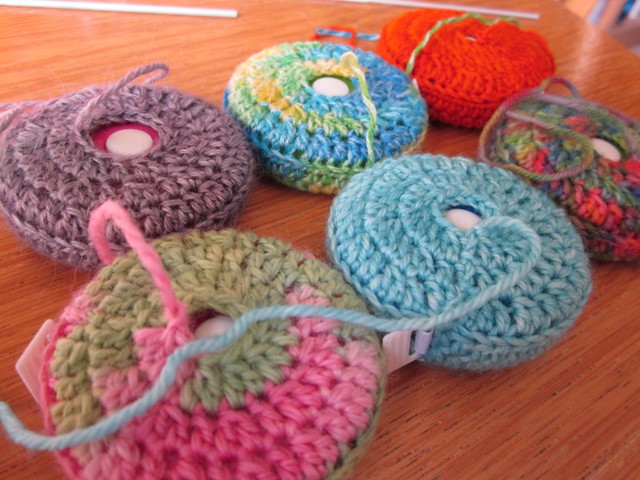
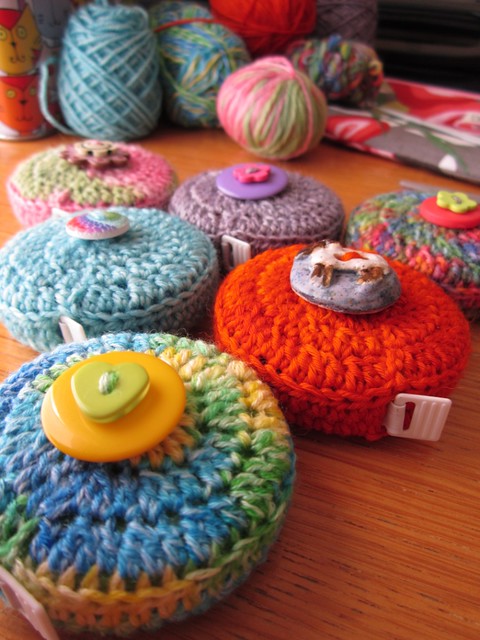
Then it's time to admire your creation and give yourself a huge pat on the back!! Ta dah!!
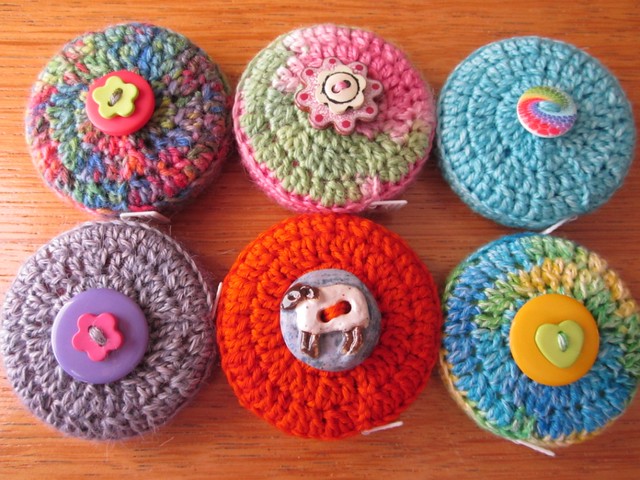

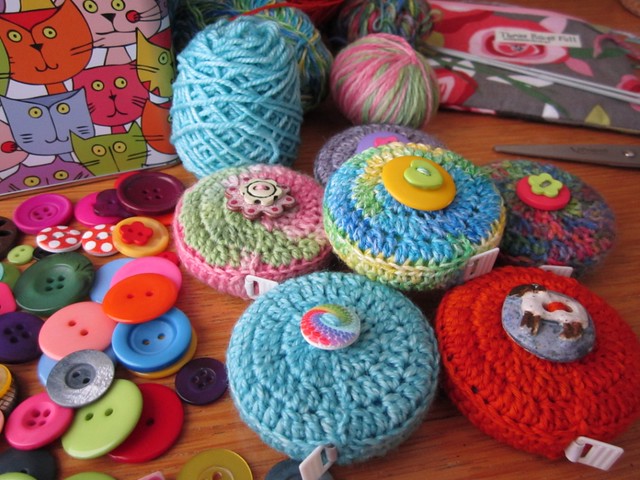

It is so hard to pick a favourite, I love them all! But I must say that I do love, love, love the button combination of the pink and green one on the top row. (The pink spotty button came from a bowl of ceramic buttons that I had a rummage through at a National Trust property down in Cornwall!) Just looking at all of these little lovelies makes me smile!
They are perfect little gifts for craft loving friends. I am going to be adding these to swap packages as well as extras for birthdays. Why don't you have a go at making one yourself? Please let me know if you have any problems understanding the pattern and I will do my best to help you out!
I thought it would be fun to have a little cosy giveaway too! Leave a comment and tell me what your favourite colour is. I will pick a winner at random on May 1st and make you a tape measure cosy all of your own!! Have fun everyone! xxx
www.deramores.com/blog-awards: This blog entry is my submission to the Deramores Blog Awards 2014. Deramores is the UK’s number one online retailer of knitting and crochet supplies.


26 comments:
Ooh, I want one! Just a shame I'm rubbish at crochet!
These are all great , thanks for taking time out to show us a tutorial, I love them all, hard to choose from , I think my favourite would have to be the top right , I love variegated yarn , but the button on the bottom left is unique , is it a sheep? How can you bear to part with them
These are wonderful. I haven't really tried crochet yet. I love the blur used in the pictures mainly because of the rainbow button.
I'm kind of thinking that I need one to go with my pink pony collection!!!
An excellent tutorial!
Your results are quite attractive.
The shaped buttons are really nice, like the sheep or dog.
Have you matched them with Three Bags Full beautiful bags?
Good luck in the competition.
Very cute! I love the pictures, buttons and the cat tin too!
I'm using your tutorial to make one for each of my daughters - I'd love to have one made for me! I love blues, lavender, and.....well, any color. I love colors!
greyowl60@yahoo.com
Oh my, Helen, these are brilliant!!! My favorite is the blue one with the green heart button. Just lovely.
Very clear directions, too. Love everything about this post. Your pictures are so clear and you presented it all in a most attractive and organized way.
Hugs for a great tutorial on making these cozies.
Kat
this might make me finally try crocheting...they are lovely.
These are great, Helen. Thank you so much for taking us through the process step-by-step. I definitely think I will want to try my hand at them in the future. Love your button collection, too! Not possible to pick a favorite out of so many great colors and choices--they are all delightful!
Really cute! I love them all. Reading the instructions was like reading a foreign language, though. I am not a crocheter!
My favorite color is purple. Love you cat tin, it is so cute.
what great tape measures! You wrote the directions out so clearly! I DO crochet - I may just have to try this :) I have so many favorite colors ;) I'll throw in pink, purple, blues! and I love the picture of Flo in there!
WOW Helen, they are so cute, I love them! My favorite colors are blue all shades of purple grey and black,
Thank you for doing this tutorial. I'll have to give it a go. Two friends have asked me for some help in learning to sew, and these would be lovely gifts for them. Now I'm off to google retractable tape measures... :)
THESE ARE FAB! I NEED one! :-) xx
oh i love these!
thanks for making a tutorial!
These are beautiful! Green is my favourite colour :)
Those are absolutely brilliant and I'm sure crafty friends, and one lucky individual, will love them. My tape measure is purely functional and came from a Christmas cracker!!
Hugs
Brenda
I love these! They are so cute and my favorite color is orange. :-) I also love your notion case! Who doesn't love Three Bags Full! :-)
great tutorial, being a visual learner and just looking at your pictures, I now know how to make it.
Love the crochet covers for the tapemeasures. Brilliant tutorial too. I love all the colours but think that the green and pink is my favourite. Jackie
Thank you for the great instructions, they are very easy to follow! I love your solid colored covers with the double buttons. So smart!
saradenbo on ravelry
These are lovely! All the colors and button choices make it hard to pick a favorite.
Absolutely wonderful these are, and what a lovely idea for swap parcels and little gifts for friends and family. I would love to win one. My favourite colour would be purple.
I love the understated grey one, bottom right.
Post a Comment